How to Create Your First Object in Blender
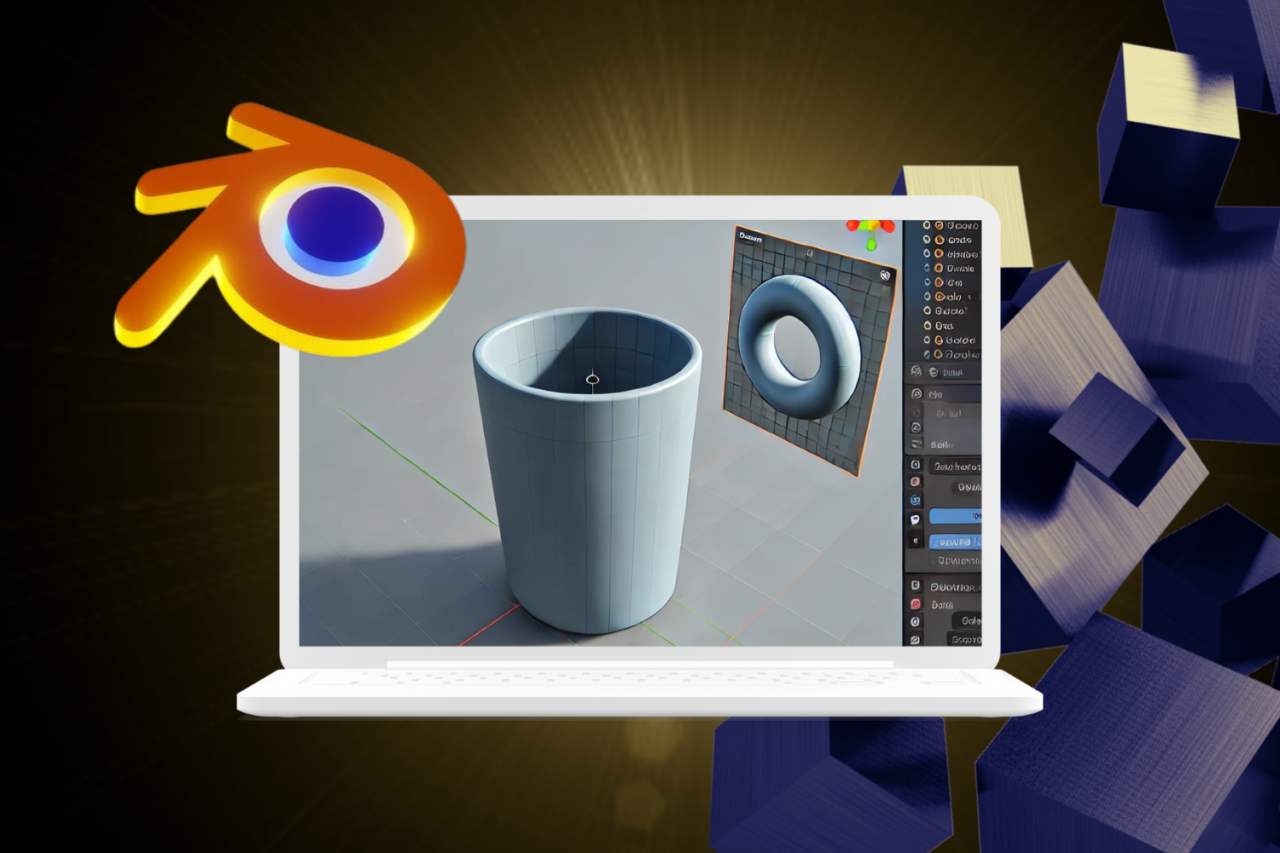
3D graphics for kids is an exciting way to develop creative thinking and technical skills. Blender is one of the best tools for beginners to learn 3D modeling. In this article, we’ll show you how to create a simple object—a 3D cup. It’s an ideal project for beginners, as it helps them understand the basic tools and functions of the program.
First Steps in Blender
- Installing and Launching Blender: If you haven’t installed Blender yet, download it from the official website and install it. After launching, you will see the start window with a cube. To start creating our cup, delete this cube by pressing “X” after selecting the cube.
- Adding a Cylinder: To create the base of the cup, press “Shift + A” or use the “Add” menu in the top left corner. Select “Mesh” -> “Cylinder.” This cylinder will become the base of our cup.
Creating the Cup Shape
- Transforming the Cylinder into a Cup:
- Scaling: Select the cylinder and press “S” to change its size, and “Z” to scale only the height. Create a shape that resembles the height of a cup.
- Entering Edit Mode: Press “Tab” to switch to Edit Mode.
- Creating the Hollow: Select the top face (click on the top circle of the cylinder), then press “E” to extrude and “S” to decrease the diameter of the top edge. Then press “E” again and drag down to create the hollow of the cup.
- Adding a Handle:
- Adding a Torus: Press “Shift + A” -> “Mesh” -> “Torus.” This creates a ring shape that we will use for the handle.
- Moving and Scaling the Torus: Press “G” to move the torus next to the cylinder. Press “S” to resize it until the ring is small enough to handle the cup.
- Attaching to the Cup: Switch to Edit Mode and move the torus closer to the cylinder so it “touches” the side of the cup.
Finalizing and Setting Up the Scene
- Setting Up the Scene: Add a camera and light source to prepare the scene for rendering. You can add a camera using “Shift + A” -> “Camera” and move it so that the cup is centered in the frame.
- Saving the Project and Rendering: Save the project through “File” -> “Save As…” and click “Render” -> “Render Image” to create an image of your cup. After rendering, you can save the image through “Image” -> “Save As.”
3D Graphics for Kids — Learning with Simple Examples
This simple example of creating a cup in Blender helps kids understand the basics of 3D modeling, such as working with geometry, extrusion, and positioning objects in 3D space. Kids will see how they can create interesting objects from basic shapes.
The “Basics of 3D Graphics” Course at GoMother School
In the 3D graphics courses at GoMother IT School, children learn the basics of modeling in Blender, mastering fundamental tools and principles for creating objects. During the lessons, they can create their 3D scenes and adjust materials, and textures.
It’s a great opportunity to develop creative skills and explore the world of 3D graphics!